How to reduce your website file size and save money on hosting!
As websites become more complex and feature-rich, they often require larger and larger file sizes to function properly. However, larger file sizes can lead to slower loading times, higher hosting costs, and even a poor user experience for your visitors. Which means hosting larger files comes with a premium tag.
Fortunately, there are several steps you can take to reduce your website’s file size without sacrificing functionality or quality. In this post, we’ll explore some of the most effective strategies for optimizing your website’s file size, including:
- compressing images
- minifying CSS and JavaScript
- utilizing browser caching, and much more
As a webmaster you should take the initiative of managing the performance of your website or hire some experts from Fivver or Upwork to do the work for you.
By implementing these techniques, you can not only improve your website’s performance and user experience, but also save money on hosting costs by reducing the amount of storage and bandwidth you require. So, whether you’re a small business owner, a blogger, or a web developer, read on to learn how to optimize your website and pay less for hosting.
There are multiple factors that slow down your website. Before you start optimizing files of your website right away, do performance tests to have a full diagnosis. There are multiple tools online you can use to achieve your goals. Some of these tools can pinpoint lag areas and recommend what ought to be done by webmasters , I believe if you are reading this article you are one of them-to solve this seemingly annoying low speeds.
Let’s get started without wasting much time and by the end of this article your site, running on any CMS or WordPress, will be up and running at hypersonic speeds.
1. Conduct a performance test for your website.
This should be the initial step towards your site’s optimization. Before you start trimming bad stuff from your web server, run performance test with the help of tools available online. Some of the free tools you can begin with are Google’s PageSpeed Insights and Hubspot’s Website Grader. These free tools come with limited utility, however you should not worry about it as there are premium tools more powerful in testing site performance as well as optimizing and making your website lightweight.
Optimization tools you should be using:
10Web is a comprehensive WordPress platform that provides various tools and features to optimize your website’s speed, security, and performance. Here are some of the ways in which 10Web optimizes WordPress websites:
Speed Optimization:
10Web uses a range of optimization techniques to speed up your WordPress website, including image compression, minification of CSS and JavaScript files, lazy loading, and content delivery network (CDN) integration.
Security Optimization:
10Web provides advanced security features, including daily backups, malware scanning, firewall protection, and SSL certificate installation to ensure your website stays secure and protected from hacking attempts.
Automated Updates:
10Web ensures that your WordPress website is always running on the latest version by automatically updating your WordPress core, themes, and plugins, thereby keeping your website secure and optimized.
Advanced Analytics:
10Web provides advanced analytics features to track and measure your website’s performance, including Google Analytics integration, real-time analytics, and heat maps.
SEO Optimization:
10Web provides various SEO optimization features, including page speed optimization, meta tag optimization, XML sitemap generation, and optimization for social media sharing.
Drag-and-Drop Website Builder:
10Web offers an easy-to-use drag-and-drop website builder with a wide range of customizable templates that can help you build your WordPress website without any coding skills.
Overall, 10Web optimizes WordPress websites by providing a comprehensive suite of tools and features that help improve website speed, security, performance, and SEO.
Now that you have the tools at your disposal, run regular tests of your site’s performance to monitor and maintain the site’s competative speeds.
2. Perform WordPress Database Cleaning.
After running your website for a while you realise that media libray is inundated with multiple copies of draft content, old files, old media. When you started blogging, you installed and activated themes and plugins for testing purposes before you settled on the ones you cherish and use right now. Some years down the line, these junks are eating up storage space in the database squeezing webserver’s optimal performance.
Spam comments by bots are sources of unwanted content consuming server resources and according to my research some plugins are more vulnerable to spamming bots. To mention a few, wpForo Forum and WPforms Lite plugins are culprits exploited by malicious spammers.
This is the time to uproot anything you don’t need to free up database space. You can delete unnecessary media files manually or use plugins dedicated for site audit. WPOptimize and Advanced database Cleaner are among the best WordPress plugins that can do the works for you.
3. Minimize Use of Images and Videos and Optimize the Required Ones
As the saying goes “too much of something is dangerous” holds true when it comes down to overuse of images in your blog posts. They consume substantial storage space rendering your site slow to load.
There are many ways of minimizing file sizes and fortunately WordPress by default comes with built-in GZIP compression method that you need to enable.
GZIP as an open-source compression method is a way to reduce the size of files, including HTML, CSS, JavaScript, and other web files. By compressing these files, they can be downloaded faster, which improves the speed of your website. WordPress has built-in support for GZIP compression, and enabling it is relatively simple.
Here are the steps to compress files in WordPress using GZIP:
- Check if your website is already using GZIP compression. Before you begin, you should check if your website is already using GZIP compression. You can use online tools like GIDZipTest to check if your website is compressed.
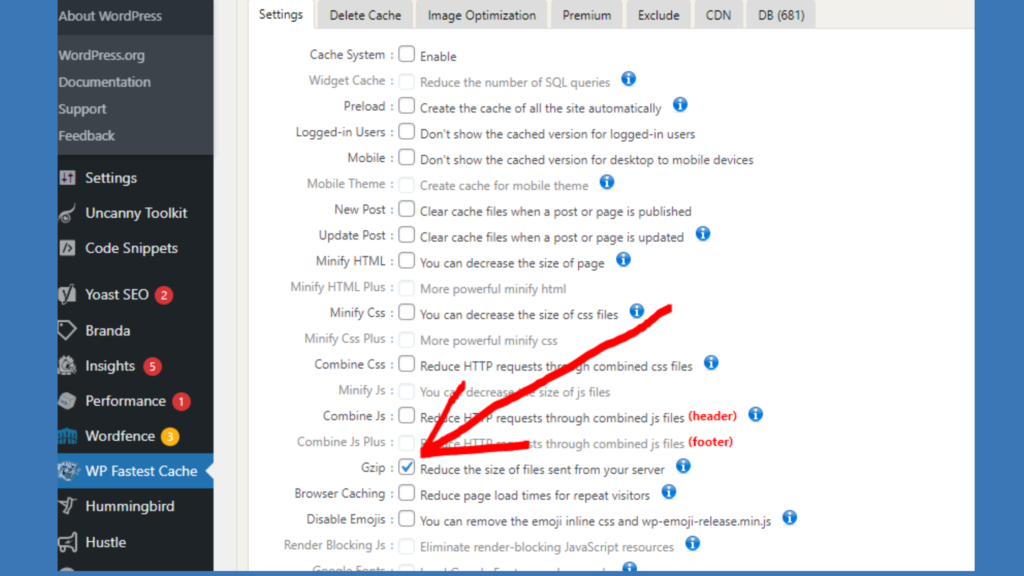
- Enable GZIP compression in WordPress. To enable GZIP compression in WordPress, you can use a plugin like WP Fastest Cache or W3 Total Cache. Both of these plugins have the option to enable GZIP compression with just one click.
Here’s how to enable GZIP compression in WP Fastest Cache:
- Install and activate the WP Fastest Cache plugin.
- Go to the WP Fastest Cache settings page.
- Enable the “GZIP” option.
- Save your settings by clicking “Submit”.
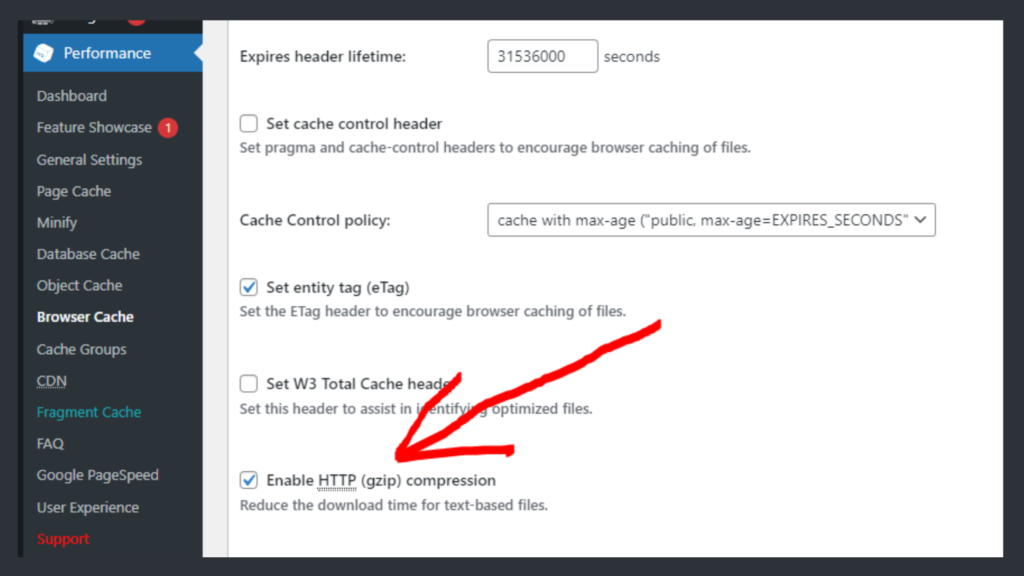
Here’s how to enable GZIP compression in W3 Total Cache:
- Install and activate the W3 Total Cache plugin.
- Go to the W3 Total Cache settings page.
- Click on the “Performance” tab.
- Enable the “Browser Cache” option.
- Scroll down to the “HTTP Compression” section.
- Enable the “GZIP” option.
- Save your settings.
- Test your website’s GZIP compression. Once you’ve enabled GZIP compression, you should test your website again to confirm that it’s now compressed. You can use the GIDZipTest tool again to check if your website is compressed.
GIDZipTest is a free online tool that you can use to test if your website is using GZIP compression. GZIP compression is a method of compressing web files, including HTML, CSS, and JavaScript, to reduce their size and speed up website loading times.
To use GIDZipTest, follow these steps:
- Go to the GIDZipTest website at GIDNetwork.
- Enter the URL of the website you want to test in the “URL to test” field.
- Click on the “Test GZIP compression” button.
- The tool will show you the results of the test. If your website is using GZIP compression, the tool will display a message indicating that GZIP is enabled and the amount of compression achieved. If GZIP compression is not enabled, the tool will display a message indicating that GZIP is not enabled.
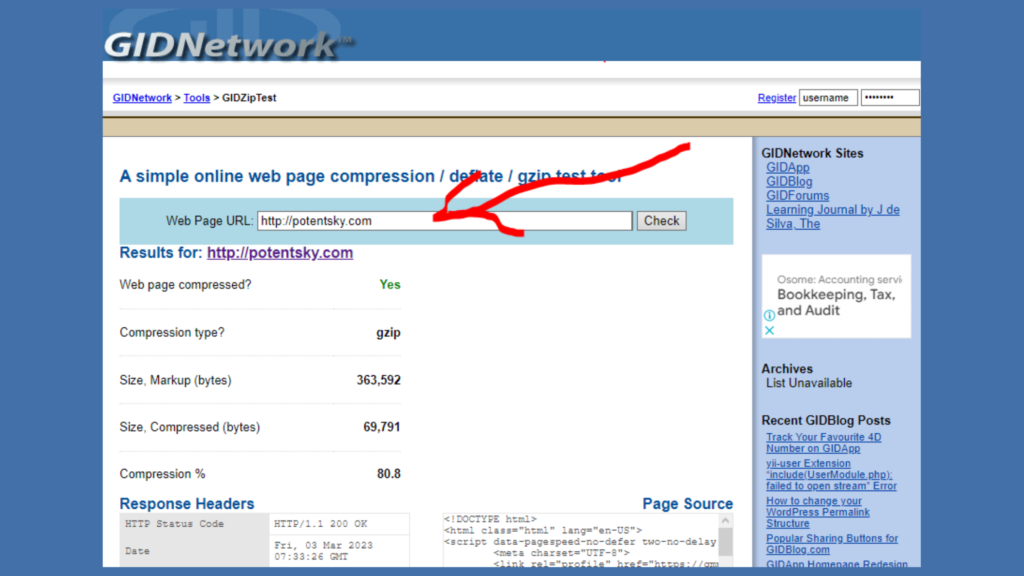
Using GIDZipTest is a quick and easy way to check if your website is using GZIP compression. If your website is not using GZIP compression, you can enable it using the steps outlined in my previous answer. By enabling GZIP compression, you can reduce the size of your web files, which can improve website loading speed and provide a better user experience for your visitors.
Compressing files in WordPress using GZIP is an effective way to improve the speed of your website. By following the steps above, you can easily enable GZIP compression on your WordPress website.
You can compress image files using powerful softwares online outside WordPress. Convertio is a mong the best external tools I use to covert JPEG, PNG, SVG to webP without compromising quality. TinyPNG and Convertio are used if you want to compress image before uploading. And with Smush, Imagify or Shortpixel plugins, images are compressed after uploading.
As for the videos, avoid using them in the background of your homepage. Videos are understood to be resource ‘guzzlers’ on your server. You should not abandon the whole idea of using videos in your WordPress website if they bring engagement to your visitors. Instead embed the videos to your blog posts using third-parties like Youtube, Vimeo and Twitch. This way you would maintain high user experience without compromising server performance.
4. Manage WordPress Duplicate Images
When you upload an image to WordPress, by default, it creates multiple copies of that image at different sizes. These multiple copies can take up valuable storage space on your server and slow down your website’s loading speed. However, you can modify your WordPress media settings to stop duplicating images.
Here’s how:
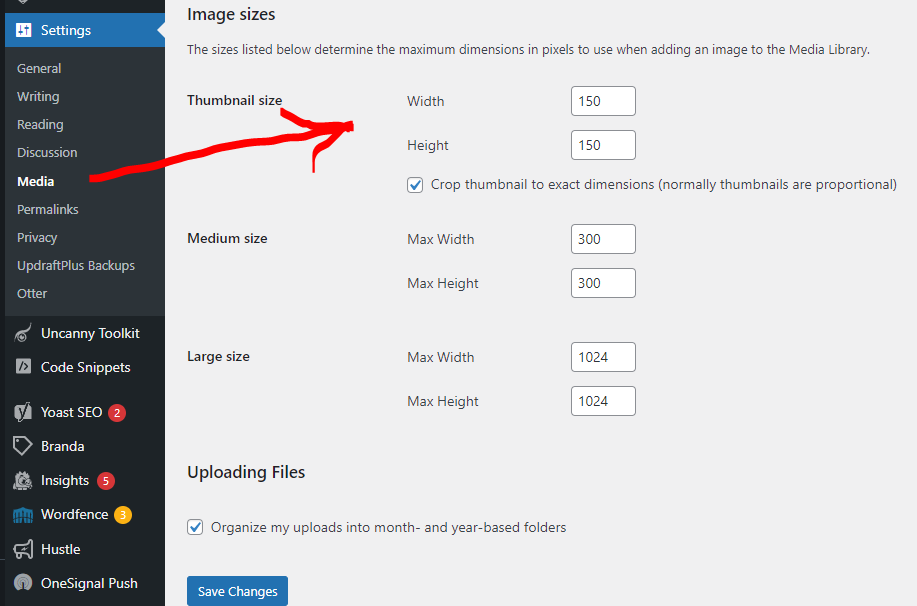
- Login to your WordPress admin dashboard.
- Go to Settings then Media.
- Under “Image sizes,” you will see a list of the different sizes that WordPress creates by default. You can modify the settings for each size by entering new values for the width and height, or by unchecking the box next to the size to disable it completely.
- Scroll down to the “Uploading files” section. Here, you can choose whether to organize your media files into folders based on the year and month of upload or to keep them in one folder. Choose whichever option suits your needs.
- Click on the “Save Changes” button to apply your new media settings.
After modifying your media settings, WordPress will no longer create duplicate images of the sizes you have disabled, which will help save storage space and improve website loading speed. Additionally, organizing your media files into folders based on upload date can make it easier to manage your files in the long run.
5. Offload Your WordPress Media to Third Party
It is imperative to maximize the concept of virtualisation so that you can use the large files your website needs deadly to enhance user experience. Host videos, photos, and other large files externally on cloud services dedicated for storage. The best cloud storage services are Amazon S3, Digitalocean, Microsoft Azure and Google cloud storage. These cloud services are accessed through WordPress plugins. For Amazon S3 use Media Cloud and Offload Cloud Media plugins, and for Digitalocean, Microsoft Azure and Google cloud apply Media Cloud .
6. Delete Unused Themes and Plugins
Themes and plugins make your website function as you wish but they occupy enormous disc space in your server. It is good practice to remove inactive themes and plugins that you have not planned and ready to use. WordPress recommends that you should have two themes installed in your website. Your live theme and WordPress default one.
Having multiple inactive plugins in your website is a bad idea and therefore should be removed because they are constantly running on the background without your knowledge depleting and overwhelming your server resources.
7. Use a Lightweight Theme and Plugin Alternatives
Now that you have prunned many plugins and themes that are not needed, consider having plugins and themes of high quality.
Choose the best plugins and themes by having a look on the reviews that users comment about their features and performance . If you see more users complain how a plugin sucks after activation, avoid installing it.
Lightweight themes are coded in such way that disc resources are used minimally. Pick a simple theme with the needed features for your pages. Avoid fancy themes because the extraneous aesthetics come with cost of large storage space. Do speed test to ensure the whole performance is significantly up to standard. You can also modify the current ones to make them better.
8. Get Rid Of Old Backups or Use an External Service
It is recommended to remove old backups you no longer need because repetitive backups done periodically by low quality plugins overcrowd your disc space. Or else use third-party storage services like Google Drive, Microsoft’s OneDrive or Dropbox. Third-party storage could put your mind at ease about file size.
9. Avoid Hotlinking and Leeching Your Website Resources
Hotlinking, also known as inline linking or remote linking, refers to the practice of displaying an image or other content on a website by linking directly to the file hosted on another website, without actually downloading or hosting the content on the website where it is being displayed.
For example, if someone wants to include an image on their website but doesn’t want to go through the trouble of downloading the image and uploading it to their own web hosting account, they might simply use the direct URL of the image hosted on another website, essentially “hotlinking” to the image.
While this may seem like a convenient way to add content to a website, it can create problems for the website owner who is hosting the content. When someone hotlinks to content on another website, it means that the hosting website is serving up that content to the hotlinking website’s visitors, using the hosting website’s bandwidth and resources. This can lead to increased server load, slower page load times, and increased hosting costs for the website owner.
Some website owners may choose to prevent hotlinking by using various methods such as server-side scripts or plugins that block requests from unauthorized websites. Additionally, some hosting providers may charge additional fees for excessive bandwidth usage caused by hotlinking.
Leeching refers to the unauthorized use of website resources by other websites or web services, which can negatively impact website performance and increase server costs. To prevent leeching and optimize website performance, add a no-leech meta tag to your header, or by using a plugin like Leech Protect.These measures can help improve website security, speed, and cost-effectiveness.
10. Organise and Assign Background Tasks for Low Traffic Periods
Scheduling tasks for low-traffic periods can help minimize disruptions to website visitors and ensure that website performance remains optimal during periods of high traffic. Here are some steps you can follow to schedule tasks for low-traffic periods:
- Analyze website traffic: Use website analytics tools to determine when traffic to your website is at its lowest. This could be during certain times of the day or on certain days of the week.
- Identify tasks to schedule: Make a list of tasks that can be scheduled, such as updates to the website’s content, software updates, or backups.
- Prioritize tasks: Determine which tasks are most critical and need to be completed as soon as possible, and which tasks can be deferred until low-traffic periods.
- Choose a scheduling tool: There are a variety of scheduling tools available, such as cron jobs or Windows Task Scheduler, that can automate the process of running tasks at specific times.
- Set up the schedule: Configure the scheduling tool to run the tasks during the identified low-traffic periods. Be sure to test the scheduling to ensure that the tasks are running as expected.
- Monitor website performance: Keep an eye on website performance during and after the scheduled tasks to ensure that there are no issues or disruptions to website visitors.
By following these steps, you can effectively schedule tasks for low-traffic periods and help ensure that website performance remains optimal during high-traffic periods.
11. Connect Your Website to CDN
A CDN (Content Delivery Network) is a network of servers that are distributed in various geographic locations to help deliver web content, including images, videos, and other static assets, more quickly and efficiently. Using a CDN can help optimize the speed of your website by reducing latency and increasing the availability of content to visitors.
Here are some steps to follow when using a CDN to optimize your website speed:
- Choose a reputable CDN provider: Look for a CDN provider that offers a global network of servers and has a good reputation for speed and reliability.
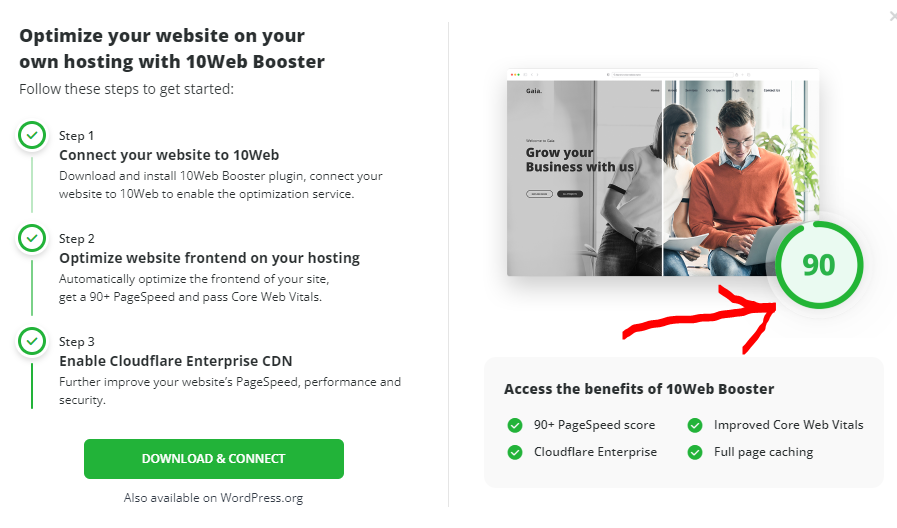
- Configure your website to use the CDN: You will need to configure your website to use the CDN by changing the URLs for your static assets, such as images and videos, to point to the CDN’s servers. This can typically be done using a plugin or by modifying your website’s code. 10web plugin is among the best in my opinion to connect your WordPress site to Cloudflare CDN.
- Configure caching settings: Configure your website’s caching settings to ensure that content is cached on the CDN’s servers and served to visitors from the closest server location.
- Monitor website performance: Monitor your website’s performance using web analytics tools to ensure that the CDN is delivering content quickly and efficiently to visitors.
- Optimize CDN settings: Work with your CDN provider to optimize settings such as cache expiration times, compression settings, and SSL configurations to ensure that content is delivered as quickly as possible.
By following these steps, you can effectively use a CDN to optimize your website speed and improve the experience for your website visitors.
12. Hosting Provider You Choose
The hosting provider you choose can impact the speed of your WordPress website by providing or limiting server resources. Server resources, such as CPU, RAM, and disk space, are necessary for a website to run smoothly and efficiently.
Here’s how hosting providers can affect server resources:
- Resource allocation: A good hosting provider will allocate sufficient resources to your website to ensure it runs smoothly, even during peak traffic times. If your website receives a lot of traffic, you need to ensure your hosting provider can handle the load by providing enough server resources.
- Shared hosting vs. dedicated hosting: Shared hosting means your website shares server resources with other websites, while dedicated hosting means your website has access to its own set of resources. Shared hosting can sometimes lead to slower website speeds due to other websites using up shared resources. Dedicated hosting generally provides better performance, as your website has exclusive access to server resources.
- Virtual Private Server (VPS): A VPS hosting plan provides a virtual machine with dedicated resources that are not shared with other websites. This can be a good option for websites that need more control and resources than shared hosting but don’t require the full resources of a dedicated server.
- Server location: The location of your hosting provider’s servers can affect the speed of your website. If your website’s visitors are located far away from your hosting provider’s server, it may take longer for the website to load due to increased latency. Choosing a hosting provider with servers in multiple locations can help reduce latency and improve website speed.
In summary, your hosting provider’s resource allocation, hosting plan, server location, and infrastructure can all impact the server resources available to your website, which in turn can affect the speed and performance of your WordPress website.